A Simple OpenLayers App with Yeoman, Sinatra, MongoDB and Backbone - Part 2
Introduction
In the previous part we set up the solution structure. In this installment we’ll get our API using MongoDB to persist/retrieve data and begin visualising this data with OpenLayers.
Setting up MongoDB
There are several options available to us for using MongoDB. The easiest way to run locally is just to install via a package manager. The default Ubuntu repositories have MongoDB, but it’s a little behind the latest version. If you must have the latest, you can add the 10gen repository and install it from there. Just follow these instructions.
The easiest way, and the way we will use, is to use a cloud provider. A couple of well known options are MongoHQ and MongoLab. This example uses the latter.
MongoLab also have an great open source tool for managing servers and replica sets called Mongoctl. I have this on all my Linux installations. I won’t go into it here, but if you’re inclined, check it out on GitHub here.
Getting the API to Talk to MongoDB
In a previous post, I explored a method of creating dynamic Ruby models suitable for use with MongoDB, but this time we’re going to use one of the Ruby object document mappers (ODMs) - Mongoid. We already added this gem in part one.
First we need for Mongoid to be able to connect to a database. Just create a file call mongoid.yml in the solution root. The simplest configuration for connecting to a local database looks like the example below. If you go with a hosted service, you just have to replace the host, user and password as appropriate.
development:
  sessions:
    default:
      database: test
      hosts:
        - localhost:27017
      username: test
      password: test
Naturally we need a model that represents a point of interest (POI) on the map. To keep it simple, I just created poi.rb in the solution root folder. Here’s what it looks like.
require 'mongoid'

class Poi
  include Mongoid::Document

  field :name, type: String
  field :desc, type: String
  field :pos,  type: Array
end
Next we need some routes for our API, so let’s set up a typical suite for handling CRUD operations:
- A GET method for retrieving a list of POIs.
- A GET method for retrieving a single POI by its ID.
- A POST method for creating a POI.
- A PUT method for updating a POI.
- A DELETE method for (surprise) deleting a POI.
As can be seen in our new API code below, Mongoid allows us to make short work of this.
require 'sinatra/base'
require 'mongoid'
require_relative 'poi'

class App < Sinatra::Base
  configure do
    enable :logging
    set :public_folder, ENV['RACK_ENV'] == 'production' ? 'dist' : 'app'
    Mongoid.load!('mongoid.yml')
  end

  get '/' do
    send_file File.join(settings.public_folder, 'index.html')
  end

  ### API Routes

  before '/poi*' do
    content_type :json
  end

  get '/poi' do
    Poi.all.to_json
  end

  get '/poi/:id' do
    Poi.find(params[:id]).to_json
  end

  post '/poi' do
    data = JSON.parse request.body.read.to_s
    new_poi = Poi.create name: data['name'], desc: data['desc'], pos: data['pos']
    response['Location'] = "/poi/#{new_poi.id}"
    status 201
  end

  put '/poi/:id' do
    data = JSON.parse request.body.read.to_s
    Poi.find(params[:id]).update_attributes name: data['name'], desc: data['desc'], pos: data['pos']
  end

  delete '/poi/:id' do
    Poi.find(params[:id]).delete
  end
end
Let’s give it a quick test using cURL.
$ curl -X POST -d '{"name":"test","desc":"test feature","pos":[5,5]}' \
  -v http://localhost:4567/poi

About to connect() to localhost port 4567 (#0)
  Trying 127.0.0.1... connected
POST /poi HTTP/1.1
User-Agent: curl/7.22.0 (i686-pc-linux-gnu) libcurl/7.22.0 OpenSSL/1.0.1
  zlib/1.2.3.4 libidn/1.23 librtmp/2.3
Host: localhost:4567
Accept: */*
Content-Length: 53
Content-Type: application/x-www-form-urlencoded

upload completely sent off: 53out of 53 bytes
HTTP/1.1 201 Created
Content-Type: application/json;charset=utf-8
Location: /poi/50f719e18cbaec991c000001
Content-Length: 0
Connection: keep-alive
Server: thin 1.5.0 codename Knife

Connection #0 to host localhost left intact
Closing connection #0
Sweet. We’ve got a 201 and location header telling us where the newly created resource can be found. Let’s retrieve it. Don’t worry about the -v (verbose) flag this time.
$ curl http://localhost:4567/poi/50f719e18cbaec991c000001
{"_id":"50f719e18cbaec991c000001","desc":"test feature", "name":"test","pos":[5,5]}
And just because we’re thorough testers…
$ curl -X PUT -d '{"desc":"updated", "name":"test", "pos":[5,5]}' \
  -i http://localhost:4567/poi/50f719e18cbaec991c000001

HTTP/1.1 200 OK
Content-Type: application/json;charset=utf-8
Content-Length: 0
Connection: keep-alive
Server: thin 1.5.0 codename Knife

$ curl http://localhost:4567/poi/50f719e18cbaec991c000001
{"_id":"50f719e18cbaec991c000001","desc":"updated","name":"test","pos":[5,5]}

$ curl -X DELETE http://localhost:4567/poi/50f719e18cbaec991c000001

$ curl http://localhost:4567/poi
[]
That’s it. Our API is functional and MongoDB is holding our data.
Talking to the API with Backbone.
First we need a Backbone model for our POIs. Let’s kick things off with Yeoman’s Backbone generator:
$ yeoman init backbone:model poi
This creates a model skeleton in app/scripts/models/poi-model.js. For brevity I’m just going to keep the default names that Yeoman creates. It’s important to set the idAttribute to the name of the MongoDB generated ID field so that Backbone can uniquely identify the model instances. Adding some defaults and a URL where instances of the model can be persisted make it look like this.
olBlogPost.Models.PoiModel = Backbone.Model.extend({
  idAttribute: "_id",

  defaults: {
    name: '',
    desc: '',
    pos: []
  },

  url: function() {
    return this.id ? '/poi/' + this.id : '/poi';
  }
});
Next we need a collection. Collections are ordered sets of model instances. Via a collection we can fetch all of our POIs from the API, listen for certain events and (my favourite) use all the Underscore iterator methods on the set. We’ll see one of these in action shortly.
$ yeoman init backbone:collection poi
Yeoman creates this collection in app/scripts/collections/poi-collection.js. We then need to indicate the type of models in the collection and specify the URL where the collection can access data. This is the result.
olBlogPost.Collections.PoiCollection = Backbone.Collection.extend({
  model: olBlogPost.Models.PoiModel,
  url: '/poi'
});
This is all we need right now. In the third and final part, we’ll be asking more of Backbone.
Showing Data on the Map
We need to include these new scripts along with their dependencies - Backbone and Underscore, in index.html. It now looks like this:
<!DOCTYPE html>
<!--[if lt IE 7]>      <html class="no-js lt-ie9 lt-ie8 lt-ie7"> <![endif]-->
<!--[if IE 7]>         <html class="no-js lt-ie9 lt-ie8"> <![endif]-->
<!--[if IE 8]>         <html class="no-js lt-ie9"> <![endif]-->
<!--[if gt IE 8]><!--> <html class="no-js"> <!--<![endif]-->
  <head>
    <meta charset="utf-8">
    <meta http-equiv="X-UA-Compatible" content="IE=edge,chrome=1">
    <title></title>
    <meta name="description" content="">
    <meta name="viewport" content="width=device-width">
    <!-- Place favicon.ico and apple-touch-icon.png in the root directory -->

    <link rel="stylesheet" href="styles/bootstrap.css">
    <link rel="stylesheet" href="styles/main.css">
    <script src="scripts/vendor/modernizr.min.js"></script>
  </head>
  <body>
    <div class="container" style="margin-top:50px">
      <div id="mapdiv"></div>
    </div>

    <script src="//ajax.googleapis.com/ajax/libs/jquery/1.8.0/jquery.min.js"></script>
    <script>window.jQuery || document.write('<script src="scripts/vendor/jquery.min.js"><\/script>')</script>
    <script src="http://openlayers.org/api/OpenLayers.js"></script>
    <script src="components/underscore/underscore-min.js"></script>
    <script src="components/backbone/backbone-min.js"></script>
    <script src="scripts/main.js"></script>
    <script src="scripts/models/poi-model.js"></script>
    <script src="scripts/collections/poi-collection.js"></script>
  </body>
</html>
The final piece of the puzzle for this part is main.js. What we need is:
- A module to encapsulate our mapping functionality including rendering POIs.
- Code to fetch all the POIs from the API via our Backbone collection.
In the code below, we first set up some namespacing (used in our Yeoman generated Backbone files). Then we declare a mapping module with an init method that creates a base layer and a vector layer for POIs with some simple default styling. This module also includes the addPois method that takes our collection and uses Underscore’s map method to transform the set into an array of OpenLayers features, which are added to the vector layer.
After the mapping module is instantiated, all we do is then fetch our collection and pass it to the mapping module for display.
;(function(root) {
  root.olBlogPost = {};
  root.olBlogPost.Models = {};
  root.olBlogPost.Collections = {};

  var mappingModule = function (ol) {
    var fromProj = new ol.Projection("EPSG:4326"); // WGS 1984
    var toProj = new ol.Projection("EPSG:900913"); // Spherical Mercator
    var map;
    var poiLayer;

    init = function (divId) {
      map = new ol.Map(divId);
      map.addLayer(new ol.Layer.OSM());
      map.setCenter(new ol.LonLat(145, -37.8).transform(fromProj, toProj), 12);

      var styleMap = new ol.StyleMap({
        default: {
          pointRadius: 7,
          fillColor: "blue"
        }
      });

      poiLayer = new ol.Layer.Vector("Poi", { styleMap: styleMap });
      map.addLayer(poiLayer);
    };

    var addPois = function (pois) {
      poiLayer.addFeatures(pois.map(function(poi) {
        var pos = poi.get("pos");
        return new ol.Feature.Vector(
          new ol.Geometry.Point(pos[0], pos[1]).transform(fromProj, toProj),
          { modelId: poi.id }
        );
      }));
    };

    return {
      init: init,
      addPois: addPois
    };
  };

  $(function() {
    var mapping = mappingModule(OpenLayers);
    mapping.init('mapdiv');

    var pois = new olBlogPost.Collections.PoiCollection();
    pois.fetch({ success: function(coll, resp) { mapping.addPois(coll); } });
  });
})(window);
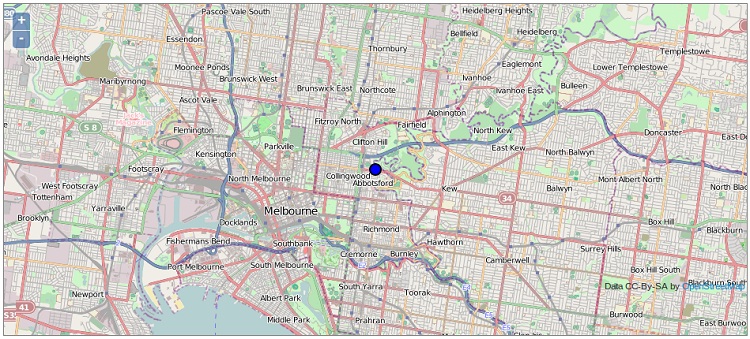
Now we haven’t yet added any front end UI for creating/editing/deleting POIs - this will come in the next part. To test that our JavaScript is working let’s add a POI via cURL.
$ curl -X POST -d '{"name":"test","desc":"test feature","pos":[145, -37.8]}' \
  http://localhost:4567/poi
Now if we view index.html via the base route of our application we should see this POI rendered in the center of our map - something like this.
That wraps up this part. In the third and final part, we’ll add interactivity to our map and use Backbone views to edit our POI data.